SWAGE

SPIN SWAGING TOOLS

The high-temperature, leakage-free swaging method, designed from the ground up for HVAC systems.

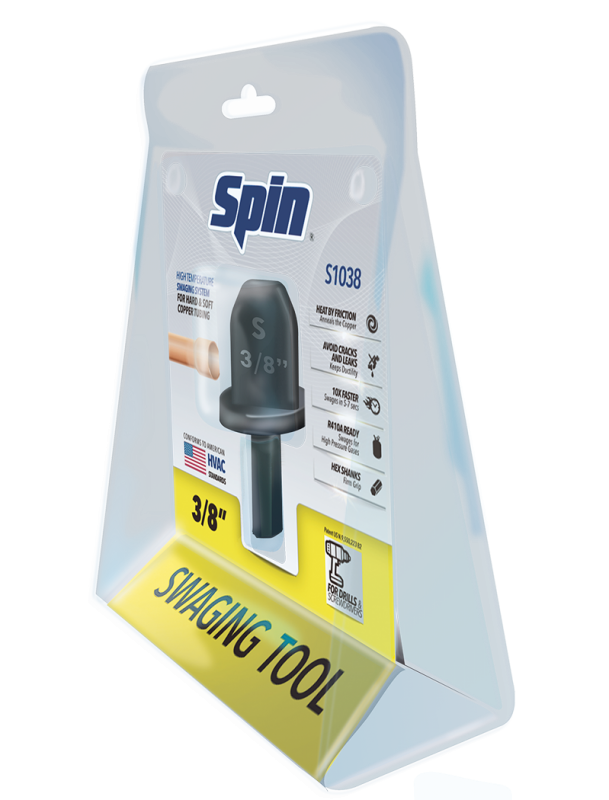
The Swaging SPIN Tool is designed for the most common tubing diameters in HVAC, and it's recommended to both soft and hard copper. The high-temperature method preserves the copper’s/aluminum’s malleability while performing the swage, preventing cracks and leaks.

The Swaging Spin Tools allows you to connect tubes with ease and without the use of extra fittings; sleeves and unions, turning potential waste into actual profit.

To top that, you can swages with the Swage SPIN Tools in just 5 seconds!

To perform the swage on copper/aluminumtubing, simply attach the corresponding SPIN Tool size to a drill*. Because they perform their job using high-temperature and friction, no clamping tools or holders are necessary.

No more struggling with the swaging tool. The drill provides the strength, not your hands!

SPIN is the new evolution for HVAC swaging tools.

SPIN SWAGING INDIVIDUAL TOOL

1/4" - 5/16" - 3/8" - 1/2" - 5/8" - 3/4" - 7/8"


HELP YOURSELF: Pick the sizes accordingly to your needs and customize your toolbox! Choose from 7 diameters for Inches, or 10 sizes for millimeters, and mix-and-match as you want!

INCHES

1/4"   - S1014

5/16" - S1516

3/8"  - S1038

1/2"   - S1012

5/8"  - S1058

3/4"  - S1034

7/8"  - S1078

MM

6mm  - S1806

8mm - S1808

10mm  - S1810

12mm   - S1812

14mm  - S1814

15mm  - S1815

16mm  - S1816

18mm  - S1818

19mm  - S1819

22mm  - S1922

S4000 SPIN SWAGING SET

1/4" - 3/8" - 1/2" - 5/8"


BASIC SET: 4 pieces is all what you need if your daily work mainly deals with mini splits lines. This economic set gets exactly what you want: from 1/4" up to 5/8".

S5000 SPIN SWAGING SET

1/4" - 3/8" - 1/2" - 5/8" - 3/4"

STANDARD SET:
Recommended for soft and hard copper, and with a range encompassing from 1/4” to 3/4” for expansions, this 5-pieces SPIN SWAGING TOOLS set has the main HVAC tube diameters covered up.

Swaging SPIN:

Better Quality Expansions! Less Joints!

Forms soft and rigid copper.
Using the Swaging SPIN you will have half the braze joints, decreasing drastically the probability of leaks. You save money by dispensing additional fittings. The Spin tool is designed to deliver an ideal swage depth to each tube diameter, minimizing the vibration fatigue phenomenum, and giving a better assurance of leak-free systems.

S6000 SPIN SWAGING SET

1/4" - 3/8" - 1/2" - 5/8" - 3/4" - 7/8"


COMPLETE SET: 6-pieces set with the most common HVAC tubing diameters: 4 basic diameters + 2 "medium-duty" pieces for larger tubes found in the field.

SWAGING SPIN METRIC SETS

CODES SIZES (MM) BITS

S4800

6 - 10 - 12 - 16 4

S4884

6 - 8 - 10 - 12 4

S5899

6 - 10 - 12 - 16 - 19 5

S5885

6 - 8 - 10 - 12 - 16 5

S5888

12 - 14 - 16 - 18 - 22 5

S5855

8 - 10 - 12 - 15 - 22 5

S6811

6 - 10 - 12 - 16 - 19 - 22 6

S6800

6 - 10 - 12 - 16 - 18 - 22 6

S6899

6 - 8 - 10 - 12 - 16 - 19 6

S6888

10 - 12 - 14 - 16 - 18 - 22 6

S6866

6 - 8 - 10 - 12 - 16 - 18 6

*Minimum Requirements

All SPIN Tools are designed to work with drills and/or screwdrivers, with a minimum of 1,800 RPM and 500 watts, for corded drills, or superior and 1,800RPM and 18V, or superior, for cordless drills. Using the SPIN Tools with a less powerful equipment tool than suggested, may result decreased and low-quality performances.

HOW TOThe 5-Second Swage: An Illustrated Guide Featuring How Effortless It Is To Use The SPIN Tools

Check for further information in the complete User's Manual or watch live How To Videos.

FASTEN IT!

FASTEN the Swaging SPIN Tool into the drill’s chuck. Ensure it’s on tight. FIRMLY hold the tube at all times. Use your other hand if needed. Important: Use rotary mode only. Hammer/impact mode will damage the tube.

LET'S GO IN...

Keep the drill at MAXIMUM SPEED, at all times. ALIGN the tube and drill. INSERT the Swaging SPIN. Maintain a CONSTANT PRESSURE through the process until the tool stopper has met with the tube.

... AND OUT!

Keep the tube and drill ALIGNED. Keep the drill at MAXIMUM SPEED. PULL OUT the Swaging SPIN from the tube. REMEMBER: this swaging process is an “in-and-out” sequel that is approximately 5 to 7 seconds.

THAT'S IT!

Immediately after, the tube’s temperature is very high. Don’t touch the swage until the tube has cooled off. FINAL RESULTS is an expansion with just the right depth and diameter to accomodate the other tube.

DO THE COUPLING!

ASSEMBLE the fitting as usual. You might find it very easy to braze this fitting. The depth of the swage assures a tight and firm coupling. Counteracting long term stress fatigue of the material.

TOP